How to Edit Email Templates

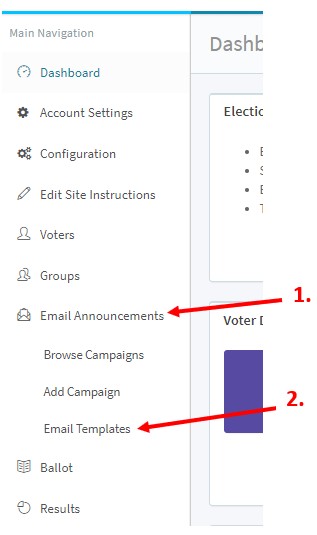
At the top of the page, there will be an Email Template field with a drop down menu available. If you have not previously created a custom template, you will see two 'Default' options - one for the announcement email and one for the reminder email. These templates are labeled as 'Default' and include the standard boilerplate text.
*Please Note: The drop-down menu will only populate once you have added an email campaign in your Voting Manager Portal. To add an email campaign, please refer to the Announcement Service Instructions Video (linked here)

1) Click on the arrow in the drop-down menu to select the template you would like to edit. If selecting one of the "Default" templates, there will only be one button labeled "Duplicate and Edit" to select.
2) Click the button labeled "Duplicate and Edit". This will make a copy of the default template, and open the page that you will be able to edit.
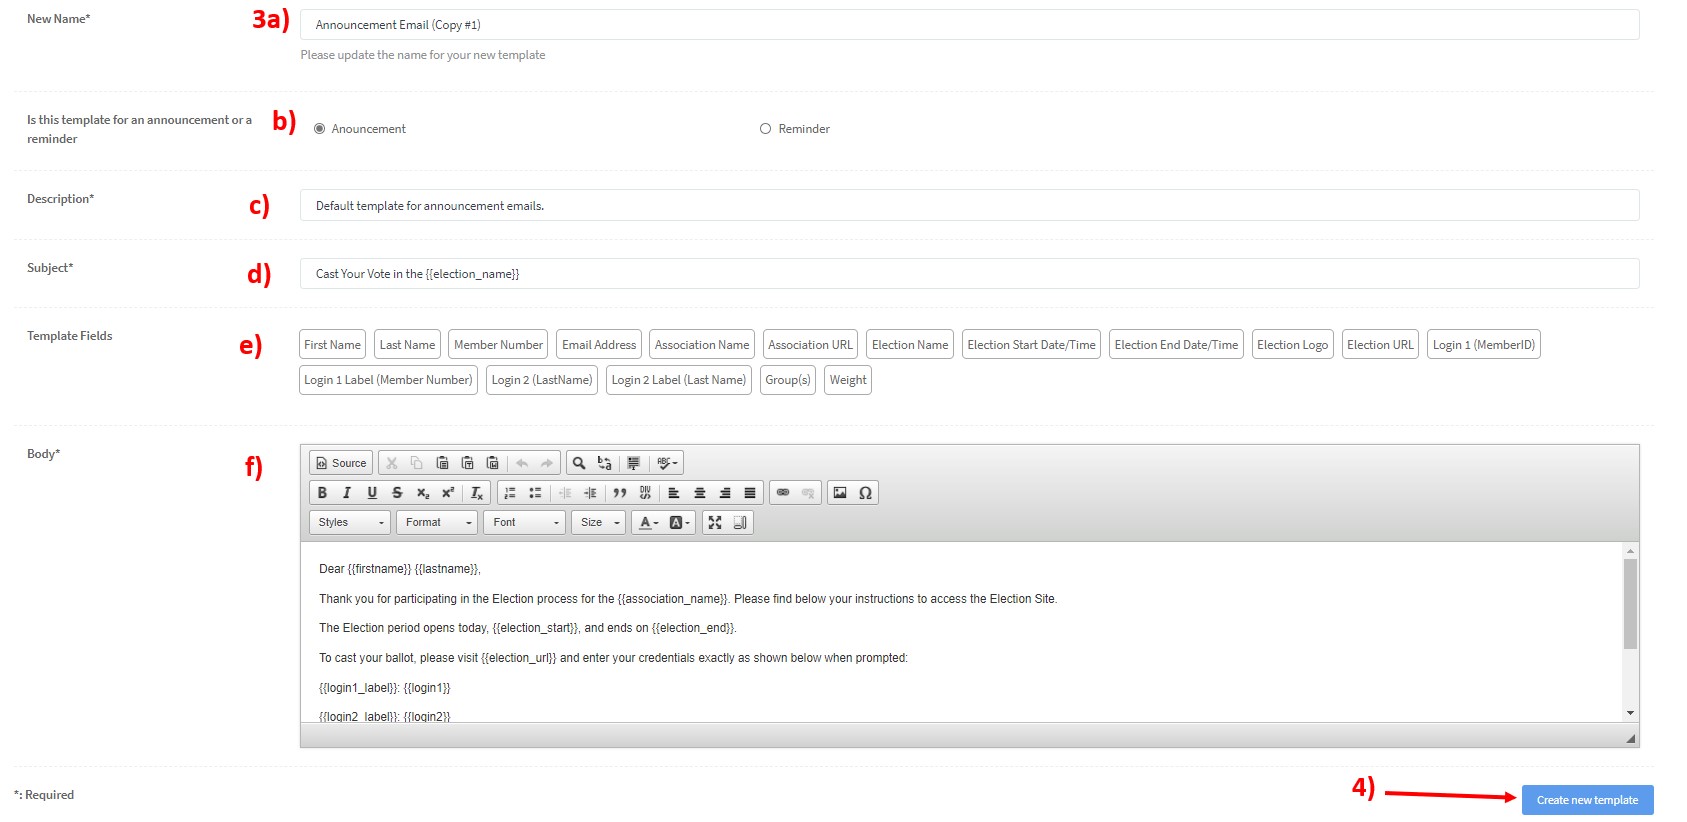
3) Please complete the following fields to edit: see screen capture below
a. New Name: A new name of the template will automatically populate this field, depending on which template was chosen. For example, if you selected Default - Announcement Email, the new name will show as Announcement Email (Copy #1). You may edit this new name as desired. ie. 'CompanyName' Announcement Email'
b. Is this template for an announcement or a reminder: Please select the radio button corresponding to the type of email template you are editing.
c. Description: Edit the existing description so that it describes your new email template
d. Subject: Edit the subject field by entering what you would like your new template subject to display.
e. Template Fields: This section includes a list of fields that can be dragged and dropped into the body or subject of your email. These fields are election-specific and voter-specific dynamic fields.
f. Body: You can change the text and add or remove fields that will appear in the body of your email.
4) Click the "Create new template" button (#3 in the below image)
 Your new template will be saved to the list of available templates. If successful, you will see a green bar across the top of the screen that says "Success: Template Saved".

You can confirm that your new template was saved by expanding the drop-down menu as descriped in step 2. Your new template can now be used when creating your new email campaigns as described in the Announcement Service Instructions Video (linked here)
After a custom template has been created and saved, the 'Template Editor Page' will provide three options when selecting the custom template to edit. These three options are: see screen capture below
- Delete this template (This will delete your custom template. The default template containing the boilerplate language will always remain available)
- Duplicate and Copy (This will keep the current template and create a new copy that may be edited.)
- Edit this template (This will edit the current template)
Select the appropriate button and repeat steps 3 and 4 above.

Related Articles
Email Announcement Instructions (video and guide)
If you have purchased our email announcement service (or turnout booster reminder email service), this video & guide explains how to create your email and schedule to send to your voters. This guide also covers Voter Verified Emails. Video: ...How do I resend my email campaign or an email to an individual voter?
Resend the email to all voters You can resend an email announcement easily via the Email Announcement -> Browse Campaigns section. For details on how you resend the whole campaign, please see this demonstration video: https://youtu.be/CeORNDbQ3pk ...History of Support Emails
History of Support Emails We have added a new feature to our software so that you can view and manage Voter Help Requests in the Voting Manager. To find the history of support emails, go to the dashboard of your Voting Manager and click "Support ...Edit Site Instructions
As the site administrator, you can change or add various instructions and messages to the voters through EDIT SITE INSTRUCTIONS. (If you are looking for how to alter specific wording or terms throughout the site, that is done through CONFIGURATION > ...How can my voters resubscribe?
If voters would like to be resubscribed, you can send them the following link to submit a resubscribe request: Resubscribe to AV Emails Please request that the voter includes your association’s unique abbreviation to help us quickly identify the ...