How Do I Add Candidate Pictures or Bios?
How to Add Images and Bios to the ballot
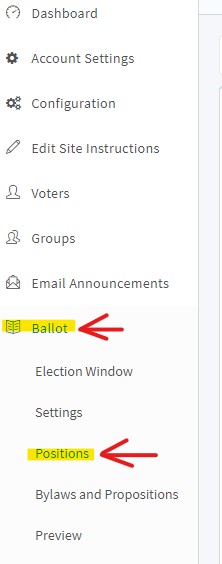
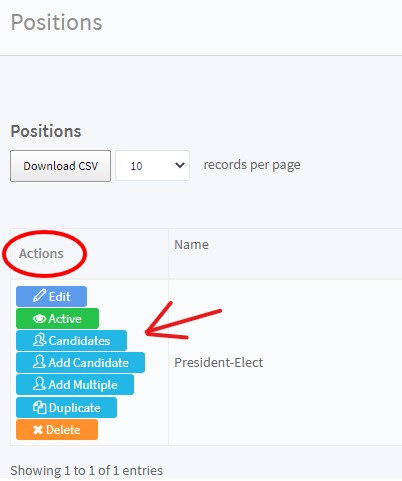
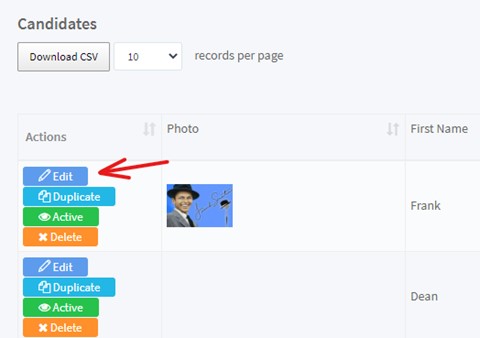
From the side navigation, click on BALLOT > POSITIONS. Under ‘Actions’, click ‘Candidates’ for the position you would like to edit the candidate information, then click ‘Edit’ on the candidate of choice. Similarly, click ‘Add Candidate’ or ‘Add Multiple’, if the candidate hasn’t been set up.
From the Candidate screen the following fields and sections are available to you:
- First Name
- Last Name
- On Ballot Description – This is a WYSIWYG editor. You can enter any descriptive information regarding the candidate here. For example: title or company name. This will appear next to the candidate/photo on the ballot.
- Biography Mode – This allows you the choice to have the biography appear on the ballot or to type in an External Biography URL website address, which will display as a link on the ballot.
- Biography – This is also a WYSIWYG editor. You can enter or cut and paste your candidate's bio here. This will appear as an expandable window on the ballot.
- Photo – Shows you the current photo shown on the ballot. From here, you can select or upload a new photo, or remove existing. The ideal image size is 150 x 150 pixels. If possible, crop or edit the photo to its desired shape and size prior to upload.
- Click on ‘select/upload’ opens a file manager that allows you upload or drag/drop your files.

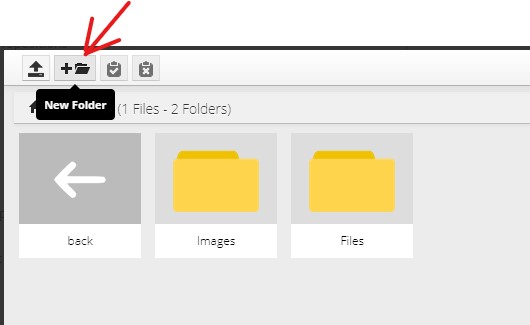
- To keep the file manager organized, we recommend adding two folders: one for images and one for files. Click 'New Folder', name each folder accordingly, and double click the 'Image' folder to open it.
- To upload your photo, click 'Upload'.

- Next, click 'Add File(s)' (#1 in image below). This will open a browser to navigate to the photo to be uploaded. Double-click your photo to select it, then click ‘Start Upload’ (#2 in the image below). Once successful, you will see a check mark to the left of the file name.
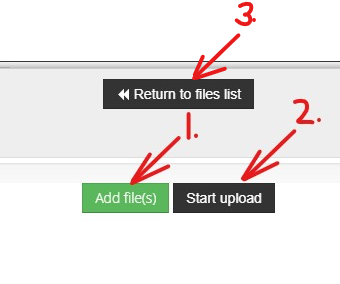
- Click 'Return to files list'. (#3 in image above)
- Double-click your photo to select it. This will return you to the 'Edit Candidate' page. The photo selected will now be displayed.
- Click the 'Update Candidate' button at the bottom of the Edit Candidate screen to save your updates.
Sections 3 and 5 (listed above) give you a WYSIWYG editor. In this box, you can type or edit in an entry of the candidate as you would into any document file or webpage. If you would like to add an image into either section, click the image icon as highlighted below.
This will bring up an Image Properties box.
Clicking on ‘Browse Server’ takes you the file manager as shown in step 6 above. Alternatively, you can also enter the website address URL of the picture if located somewhere else online. If you do not like the size of your picture, width and height can be adjusted in the Image Properties box. The ideal image size is 150 x 150 pixels. Clicking the lock image will maintain size ratio of the picture should you type in a specific width or height.
How to Add Bios as a PDF attachment
To include the biography as a pdf, you will first need to upload the PDF files to the uploader tool within the system using the steps below:
- Go to Ballot > Positions and click the candidates button.
- For the first candidate, click Edit.
- About halfway down the page, you will see a Biography Mode setting and the Biography section (text editor).
- Place your cursor in the blank area of the text editor
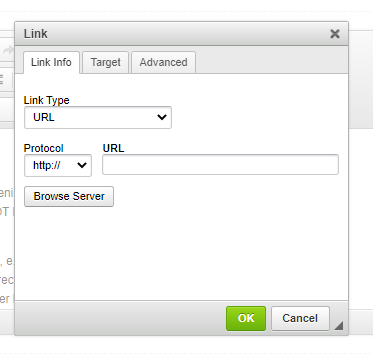
- Click the "link" icon (see image below). This will open the Link info as seen below:

- Click the Browse Server button to open the file manager (see image below)
- Double click the “Files” folder (see image below)
- Create a New folder for your current election if one does not exist by clicking the icon in the image below

- Once the folder is created, open the folder by double clicking.
- Click the Upload icon (see image below)

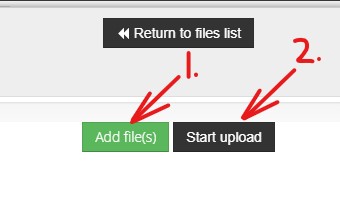
- Click the green button that says Add files (#1 in image below) This will open your File Explorer window to search for the files on your computer.
- Select all of the files that you would like to upload (you can do multiple at a time by holding down the CTRL button while you click)
- Click Open
- Click the black “Start Upload” button (#2 in image below). If successfully uploaded, you will see a check mark next to the file name on the left
- Click the black “Return to files list” button. This will show you all of the pdf files that you have uploaded.
- Double click on the PDF file that you would like to link to the candidate. In the Link Info window, you will then see the URL filled in the URL field.
- If you would like to modify the link to open in a new window vs. a popup window, select the Target tab and make your selection. Click Ok when finished.
- This will place the URL in the biography section of the editor.
- Highlight the URL and use CTRL-X to cut the URL from the editor.
- Change the biography mode setting above to “External Biography URL”
- Use CTRL-V to paste the URL in the “External Biography URL” box
- Click the blue “Update Candidate” button to save your changes.
- Repeat for each candidate.
Related Articles
How to Upload Your Ballot using a .csv file
We now have a tool available to upload your ballot information! We recommend using the upload tool when you have a long ballot, with multiple positions, candidates, and bylaws and propositions. A file template named "Ballot Upload Template.csv" has ...Copy and Paste vs URL Linking Content (Candidate bios or bylaw details etc.)
This article explores when it is best to copy and paste information into the WYSIWYG Editor Box vs. linking to the content from the election site. Presentation options: Copy and Paste Content vs. Link to Content Copy and Paste into text editor Copy ...How to Add a linked attachment to your ballot instructions / Ballot
You can add a link or a linked attachment in any WYSIWYG editor throughout the Voting Manager admin. Here is how: 1) Select your desired text you wish to make a link in the WYSIWYG. Utilize the Link button on the editor tool bar. There is a delete ...How can I put the Bylaws / Proposition section ahead of the Positions/Candidates section on my Ballot?
To put the Bylaws ahead of the Candidates on your ballot, first go to BALLOT>SETTINGS > Appearance Settings tab. In this tab you can modify the appearance of your ballot. Find ‘Ballot item ordering’ and select the option that states ...How to add a voter (or a couple of them)!
Sometimes you forget to add one or two people for voting or there are some new members you’re your organization! It is really easy to add individuals without making a whole new excel.CSV file to upload. This method of course is recommended if you ...