Email Announcement Instructions (video and guide)
If you have purchased our email announcement service (or turnout booster reminder email service), this video & guide explains how to create your email and schedule to send to your voters. This guide also covers Voter Verified Emails.
Video: https://youtu.be/g8YnHFP8XAE
Video Index:
How to create/add a new email campaign 1:05
How to send a test of the email 4:54
Scheduling the email 6:32
Monitoring the email 7:35
Video Index:
How to create/add a new email campaign 1:05
How to send a test of the email 4:54
Scheduling the email 6:32
Monitoring the email 7:35
Send an Email Announcement Quick Start Guide
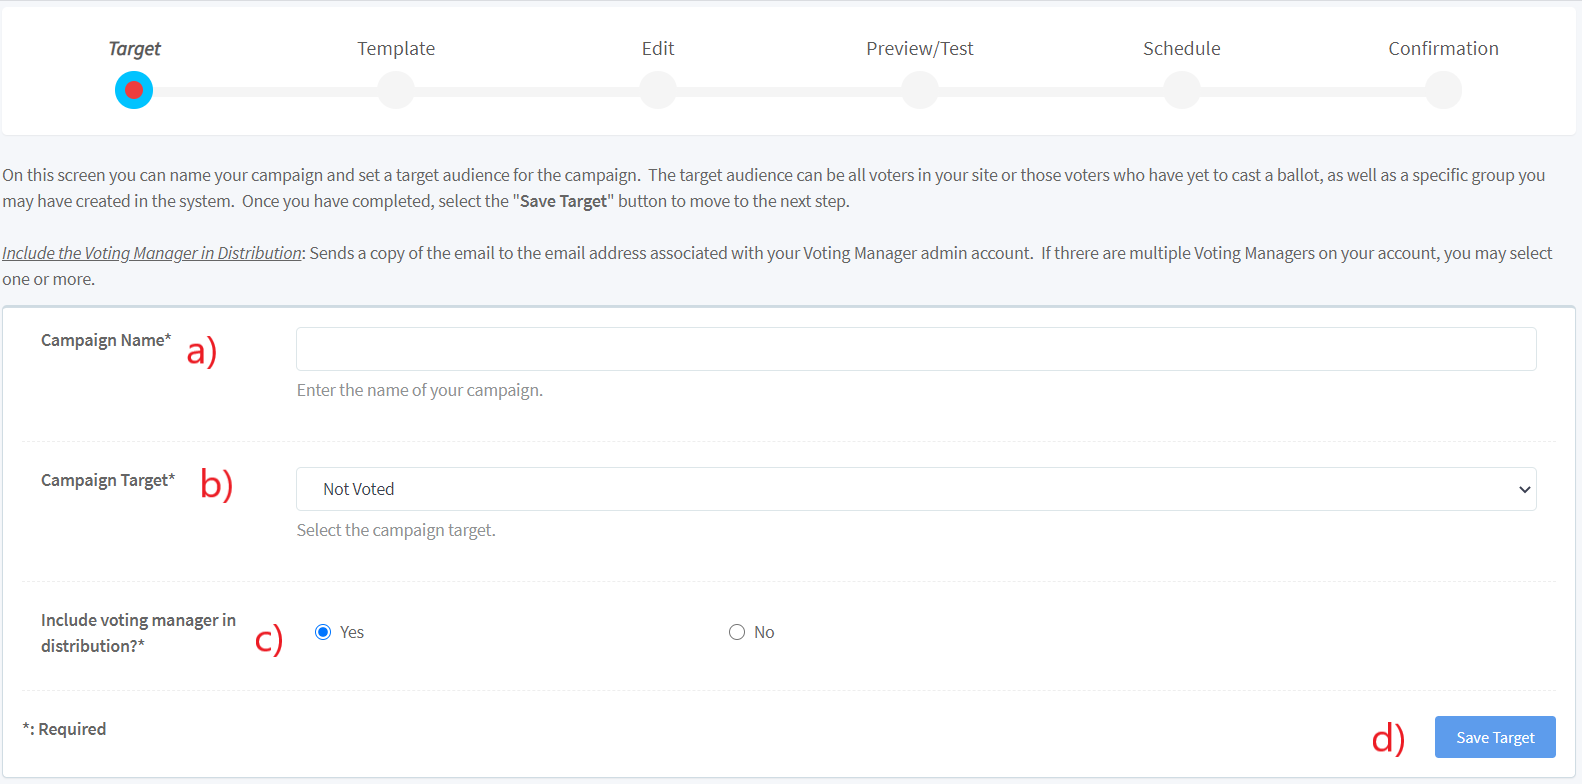
Via side Navigation goto Email Announcements > Add Campaign
Email Target

a) Name your campaign
b) Select target: it can be a group, all voters, or only those voters who haven't voted yet (Not Voted)
c) Include Voting Manager in the distribution: YES - Sends a copy of the email to the email address associated with your Voting Manager admin account. If there are multiple Voting Managers on your account, you may select one or more. NO - the voting manager won't recieve the email.
d) Select the Save Target ButtonTemplate

a) Select your email template: Announcement (sent at the start of the election) or Reminder (used to send to voters who haven't yet voted but were sent the announcement).
b) In this block, you can preview the template text for the template you selection
c) Click the Save Template Selection button to continue to the next step.Edit

a) The field column includes a list of fields that can be dragged and dropped into the email body. These are election-specific and voter-specific dynamic fields.
b) Email Subject: you can change the text and add or remove fields.
c) Email Body: you can change the text and add or remove fields here.
d) Save Changes Button: If you make changes to the screen, you MUST save the changes
e) Save As New Template: If you have made changes and want to use this email as a template in the future, select Save As New Template and follow instructions.
f) Select Preview/Test Button to continue to the next step.
NOTE: The Voter Verified URL field isn't included with the standard email. Instead the Login 1 and Login 2 fields are utilized.
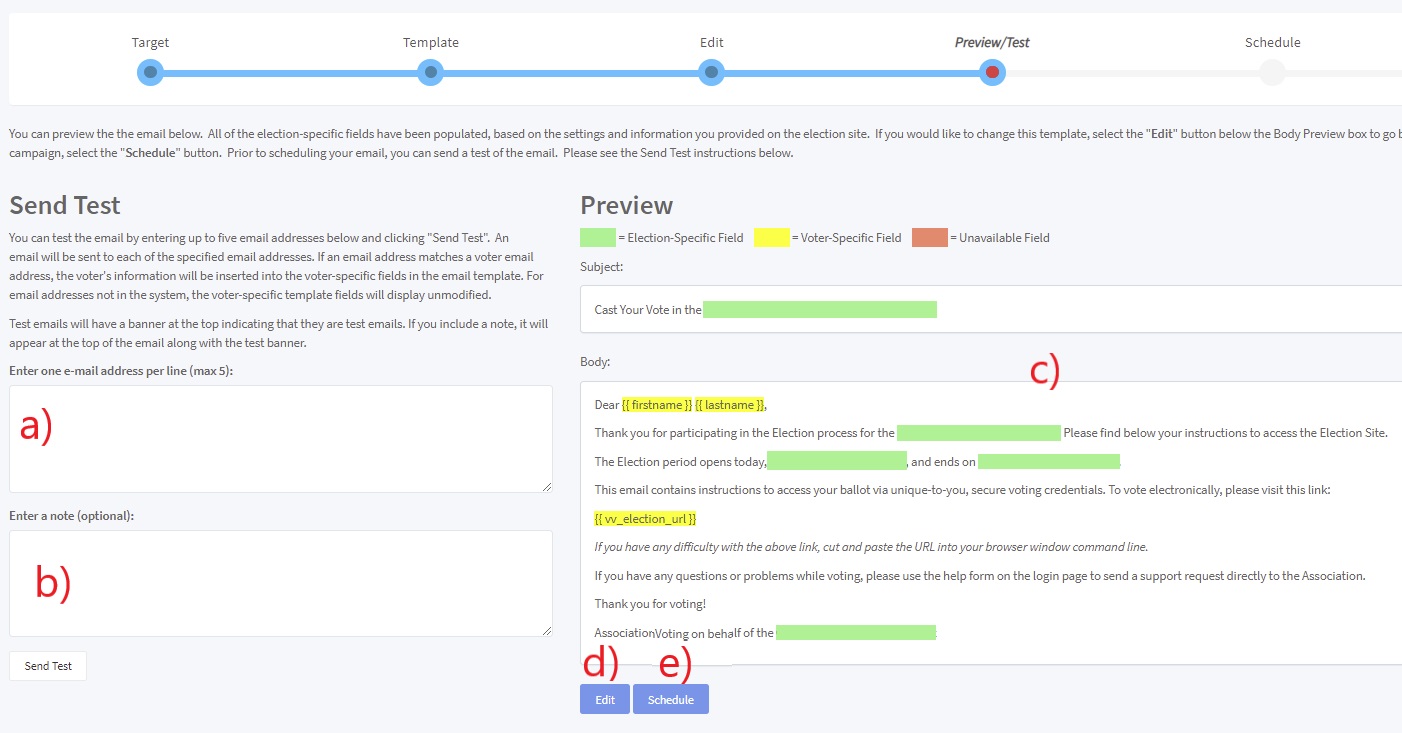
Preview & Test

a) Test email addresses: Add email addresses that you would like to receive a test here. You may enter one (1) email address per line, Max. of 5.
b) Enter an optional note to the tester. There will be an indicator that this is a test in the email sent as well.
c) Preview area: Green fields will be filled in with election-specific text and yellow fields will be filled in with voter-specific text. RED Fields are NOT Available. If a red field is indicated select Edit (d) and remove the field.
d) To go back to the edit screen and make changes, select the Edit button
e) To continue, select the schedule button.Schedule

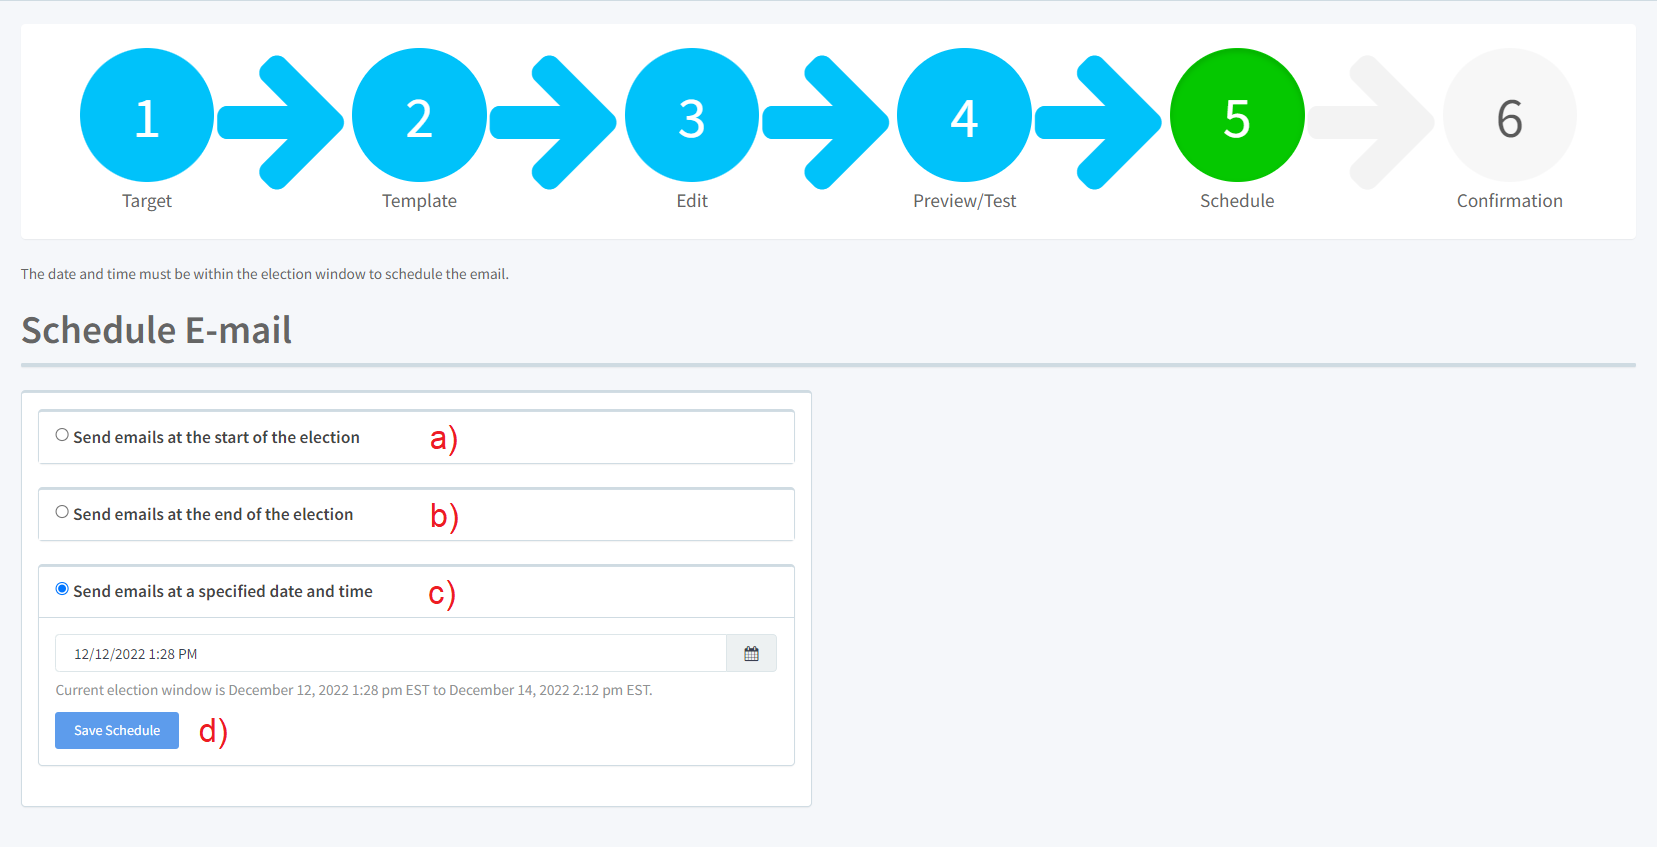
a) Send emails at the start of the election, this will automatically schedule the email at your election start date and move with it if it changes.
b) This will automatically schedule the campaign to send at the end of your election. The send will change with changes to the end date of your election.
c) Scheduling on your own time this option allows you to select the time you wish to send out the email whether it be a reminder email in the middle of the election or if you want to send something out before the election even starts!
d) Tap the Save Schedule button once you select one of the options to schedule the email.Confirmation

You will see a confirmation screen once the email campaign has been successfully scheduled.
If you would like to view the email campaign again, you can find it by going to Email Announcements > Browse Campaigns. You will have the following options:
- Edit unsent campaigns: Click the 'Edit' button. Since your email has already been scheduled, the blue navigation bar at the top of the page will be set on the 'Confirmation' step. To go back to a previous stage (ie. edit or preview/test), simply click on the blue dot along the navigation bar that corresponds with the step to which you would like to return.
- Duplicate: Click the "Duplicate" button to create a copy of the email campaign
- Unschedule: Click the "Unschedule" button to cancel an email campaign that has been scheduled. This button will only appear if the email has been previously scheduled.
- Delete: Click "Delete" to remove the email campaign from your email listing.

Need assistance setting up your election?
Reach out to ssupport@associationvoting.com and we will send over an invoice with the $250 setup fee.
Please note we will need all of your setup information at least 5 days prior to the election starting.
Reach out to ssupport@associationvoting.com and we will send over an invoice with the $250 setup fee.
Please note we will need all of your setup information at least 5 days prior to the election starting.
Related Articles
Voting Manager Quick Start Guide & Demonstration Video
A short easy to follow guide with simple steps to set-up your election can be found here: https://www.associationvoting.com/user_files/AV_VotingManagerQuickStart.pdf Here is a QuickStart Guide Video to guide you through the setup of your online ...Uploading Voters CSV Help Guide & Demonstration Video
Please find below a link to our Uploading Voters CSV User Guide & our video demonstration of Uploading Voters to the election site. The guide includes instructions for uploading voters to your election, and troubleshooting issues. Please follow the ...Proxy Election Setup Tutorial and User Experience Video
This YouTube Video explains the elements of a Proxy Election, how to setup a proxy election and the user experience when assigning a proxy. LINK TO VIDEO Video Index: Proxy definition- 0:19 Limited vs General proxy- 0:51 Assign the proxy- 1:20 Proxy ...Duplicate and Resend an Election Email Instructional Video
If you have purchased our email announcement service (or reminder email service), this video explains how to duplicate a sent email and schedule to resend the email campaign. Video Link: https://youtu.be/Gr3MUljQTqI NOTE: To duplicate an announcement ...Standard Email Announcement Boilerplate
Example email of body we send to voters with our Standard Email Announcement Service. Text in Red Font is personalized to the member and organization. +++++++++++++++++++++++++++++++++++++++++++++++++++++++++++++++++++ Subject: Cast Your Vote for ...